AI Assist in AutoFill
The Project AutoFill panel allows users to refine their results further if the suggested results do not adequately answer the questions. If enabled, AI Assist works seamlessly here to provide additional options using AI to generate a new answer or suggest five answers from the library in addition to a new AI generated answer.
Note: For more information on AutoFill permissions, settings, and functionality, see AutoFill.
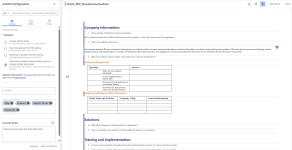
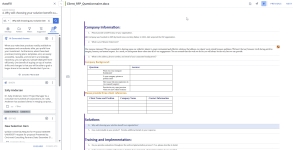
The AutoFill panel with "Show top 5 answers from the Library plus an answer written by AI Assist" selected (left) and the AutoFill results panel (right). Click to enlarge.
Caution: The file size limit of automatically inserted (auto-populated) AutoFill answers is 10 MB and has no limit for manually inserted AutoFill answers.
Run AutoFill with AI Assist
- Do one of the following:
- To run AutoFill for selected slices, select one or more slices, right click, and select AutoFill from the menu.
- To run AutoFill for the entire questionnaire, click the AutoFill Options
 icon at the top of the page and select the Run AutoFill option.
Note: If you have tables in your RFP, the following message will display: "Tables have been detected. Results for tables will not be shown. Select table(s) separately for AutoFill to process them."
- The AutoFill panel will open and display the Settings tab, where you can set up your AutoFill configuration.
- Under Answers, select one of the following:
- Answer with AI Assist: Automatically inserts a custom answer written by AI Assist into the file beneath each question slice and lists the top 5 suggestions in the dashboard. You can choose to replace the top suggestion. The following user permission must be enabled to see this option: "Allow user to use AI Assist in AutoFill to SHOW a generated answer for each question".
- Show top 5 answers from the Library plus an answer written by AI Assist: The search results include a custom answer written by AI Assist followed by the top 5 suggestions from the library. Manually select the desired answer. You can add one or more suggestions manually. The following user permission must be enabled to see this option: "Allow user to use AI Assist in AutoFill to INSERT a generated answer for each question".
Note: The following options are also available: Insert top answer from the Library and Show top 5 answers from the Library. For more information on these options and running AutoFill in Word or Excel, see Run AutoFill on Microsoft Word and/or Run AutoFill on Microsoft Excel .
- Once AutoFill runs, the AI generated answer will appear at the top of the Results panel and display the following options on the card:
- Insert: This option allows you to insert or remove responses.
- Download: Select Download from the More Options
 menu.
menu. - Preview / Show Preview: Click the Show Preview button or select Preview from the More Options
 menu.
menu. - View Sources in Library: Select View Sources in Library from the More Options
 menu. The library will open in a new tab and display all the sources that have been used to generate the AI Assist response.
Caution: If an answer is found, but the content does not match the question, the following message is displayed: "The provided context does not contain information about...". If no answer is found, the following message is displayed: "No results were found!".
Note: When running AutoFill with AI Assist on a multi-part question, the system may generate up to 5 answers for each question that is found.
- Choose a Language to search, if you store content in multiple languages. The search will only return records tagged with the selected language in the record's properties.
- Select the content record properties to run the search against:
- Title: Title of the content record.
- Keywords: Keywords are words or phrases manually assigned to content records to categorize them.
- Search terms: Terms are automatically added to content records to improve search results.
- Content: The text in the content.
- Enter any rules for how the AI generated answer is written in the AI Assist Rules text area (e.g. word length, character length, language, etc.).
- To search custom terms, enter text into the search bar and clicking the Search button or pressing Enter.
- Click the Folders tab to narrow your search results.
- Click the Filters tab to narrow your search results.
- Click Run AutoFill. As AutoFill returns the results for each selected slice, the left side border of the slice will turn purple, the progress will be indicated on the right side of the RFP title bar and the AutoFill panel displays in the dashboard. Once the AutoFill process is complete, a dialog displays. You do not need to wait for all the results to be returned to begin working with suggestions.
- If you chose to automatically insert records, the top suggested result will be inserted beneath each selected question slice.
- If you chose to have the top answers suggested, do one of the following:
- Click the Insert
 icon for the desired slice(s).
 - Drag and drop the suggestion into the question slice(s).
- Click the Insert
- If the top suggestion is a non-Word file, the suggestion will not be automatically inserted. Click the Download
 icon. Once the file has completed downloading, open it and copy the desired content. Right-click the blank answer slice and select Edit Inline and paste the copied content directly into the slice and click Save.
- Click Complete. If you chose to run AutoFill on the entire document, click the AutoFill Options
 icon at the top of the page and select the Complete All AutoFill Responses option.
Tip: When you set up and run AutoFill, the configuration is remembered. If you want to use the same settings, you can skip the setup and click Run AutoFill.
Note: If running AutoFill in Excel or Word tables, select the number of cells and the direction from the question cell in which to add the content using the Insert answers in area(s) dropdown menus (e.g. to add content to the cell directly below the question cell, select "1", and then select "Down").
Tip: The system will remember and display previously used rules that can be selected from by clicking the dropdown menu icon, ![]() .
.
Caution: Any AI Assist Rules that are entered when running AutoFill will override a role's applied writing characteristics. For more information, see AI Assist Tone & Terms.
Note: To clear the Search box, click the X in the field.
Tip: AutoFill's Folders tab uses Search Mode functionality. For more information see, Search Mode Folders.
Tip: AutoFill's Filters tab uses Search Mode functionality, including suggested filters. For more information see, Search Mode Filters.
Note: A blue checkmark displays on the record(s) that are inserted into the questionnaire. Click the Remove response checkmark on any suggestion in the AutoFill panel to remove it from the cell. When you remove a suggestion, the cell returns to its previous state.
Tip: If you choose not to use any AutoFill suggestions, you can cancel AutoFill for individual questions or the entire questionnaire by clicking the AutoFill Options ![]() icon at the top of the page and select the Stop and Cancel AutoFill option.
icon at the top of the page and select the Stop and Cancel AutoFill option.
Note: To discard suggestions for selected slices, click the Discard button at the bottom of the AutoFill panel. To discard suggestions for all slices in the file, click the AutoFill Options ![]() icon at the top of the page and select the Discard All AutoFill Responses option. Once discarded, the purple border will be removed and suggestions will no longer display when the slice or cell is clicked.
icon at the top of the page and select the Discard All AutoFill Responses option. Once discarded, the purple border will be removed and suggestions will no longer display when the slice or cell is clicked.
Exclude from AI Assist
Flag content, individually or in bulk, to be excluded from consideration when writing and revising answers with AI Assist.
Example: Exclude sensitive customer-specific content from being used when running AutoFill and answering with AI Assist.
Note: To flag content, select the Exclude from AI Assist checkbox on the Edit Content Properties "Details" tab. Flagged content can be easily identified with the "Exclude from AI Assist" field, which can be displayed in the following areas: library grid, library Content Summary, Review Jobs and Manage Review Jobs Content Summary, Submit Content pages, and Analytics views and data sources.
Caution: This feature is NOT available in Qvidian for Office / Qvidian for Web.

